
Post-match report · Esports World Cup 2026 · 16 August 2026
Читать по-русскиMOUZ — PARIVISION
 MOUZ13
 PARIVISION4
PARIVISION found the opening kills on the T side but converted them into a stable advantage too rarely: Jame won four of the five successful opening duels, and the team won only two of those rounds. MOUZ's CT-side openings were distributed across roles and converted into wins much more reliably, so isolated failures did not change the pattern of the half.
How the map went
MOUZPARIVISIONpistol rounds carry a dot, rounds thrown away are outlined
What decided the map
The difference in the first half came from how the teams handled the opening kill: MOUZ found openings from several areas and roles, while PARIVISION's T side depended on Jame and often lost the advantage he created.
MOUZ won 7 opening CT duels and took 6 of those rounds — 86% conversion against the corpus baseline of 67%; five different players found openings. PARIVISION won 5 opening T duels, four of them by Jame, but only 2 rounds ended in wins — 40%. xertioN's move out of Mid Doors and xelex's opening in Long Doors matched MOUZ's previous tendencies: xertioN was in Mid Doors in 11 of 67 rounds, while xelex moved from Long A to Long Doors in 8 rounds.
R1R2R3R4R5R6PARIVISION used early utility across the broad A Short / CT approach area in every T round, but its most damaging losses came in the central areas, where the immediate trade was almost never found.
PARIVISION used 30 pieces of early utility in A Short / CT approach in 12 of 12 rounds and 15 in B Doors in 8 of 12. At the same time, PARIVISION lost 9 players in Mid Doors with 11% traded deaths, 5 in Catwalk with 0%, and 4 in Top of Mid with 0%; the overall traded-death rate on the T side was only 8% against the corpus baseline of 19%.
R5R9After the break, MOUZ kept most of its grenades for the developing phase of the round and could change the area of pressure after the opening contacts.
On the T side, 19 of 32 pieces of early utility were used after 0:45. The broad A Short / CT approach area received grenades in 4 of 5 rounds, while B Site and B Doors each received them in 3 of 5; MOUZ won 4 of 5 T rounds.
R14R15R16R17
What they did differently
- PARIVISION T — they usually run 5 Mid (44 of 89); here it was 1 A + 4 Mid (6 of 12)
How to use this
Against MOUZ
- On your T side, prepare a flash for Mid Doors and Short Stairs: xertioN found the opening kills there in the first two rounds of the map at 0:18 and 0:34, and Mid Doors was part of his previous positional pool in 11 of 67 CT rounds.
- Wait out MOUZ's opening utility package in Lower Tunnels and return to the area after 0:13: on this map, the defense invested utility there in all 12 rounds, while historically its smokes and molotovs regularly landed at 0:09–0:13.
- On CT, keep a smoke or molotov for A Site and A Pit after 0:45: MOUZ used 19 of 32 pieces of utility in the late phase and shifted the focus to A in the closing round with grenades from torzsi at 1:07 and Spinx at 1:12.
Against PARIVISION
- After Jame's first AWP contact around 0:58, block his repeat peek with a smoke and change direction quickly: he made 4 of 5 T-side openings in Middle and Outside Long, but PARIVISION converted only 40% of those rounds.
- Against the 1 A + 4 Mid start, pressure with a pair through Long Doors and A Pit while cutting off Mid Doors with a smoke: PARIVISION chose this setup in 6 of 12 T rounds instead of its previously frequent 5 Mid setup.
- On your T side, build the entry through Mid Doors only with a second player ready: PARIVISION lost nine players there and traded only one death; Catwalk and Top of Mid produced another nine losses without a single trade.
How it looked
- R1
Mid Doors activated MOUZ's familiar setup
xertioN opened the round from Mid Doors at 0:18 — a position where MOUZ had used him before, in 11 of 67 CT rounds in the sample. xelex's smoke in Lower Tunnels at 0:10 also matched the team's previous opening utility packages, where this area was blocked around 0:09–0:13. The routes of zweih, xiELO and FL1T went through Long Doors, but all three deaths went untraded, so PARIVISION's opening setup quickly lost density. MOUZ finished the round with all five players alive and established the pattern of its CT half: the threat came at the same time from Mid Doors, B Doors and Spinx's long rotation to Outside Long.
Steps - R5 · 2:23
Jame's two kills did not survive the loss of central control
Jame created a 5v3 advantage for PARIVISION from Middle, but his death in Top of Mid at 1:30 went untraded. Before that contact, MOUZ restricted space in sequence: xelex threw a smoke in Lower Tunnels at 0:06, Spinx a molotov in A Pit at 0:09, and xertioN blocked Mid Doors with a smoke at 0:09. After Jame went down, the T side lost the player who had provided both of its advantages, while the deaths of zweih in Short Stairs and FL1T in Extended A also received no quick response. This showed PARIVISION's main problem: the opening kill created a good situation, but the following contacts were taken separately.
After this opening (196 similar rounds on the map on a full buy): first contact at 28.2s against the usual 18.9s.
Steps - R9
A rare trade kept PARIVISION's force alive
This round showed the element PARIVISION's T side usually lacked: after PR's opening kill on B Site, FL1T answered from Mid Doors two seconds later and restored a 4v4. Before that, the team invested twice in CT Spawn with smokes at 0:38 and 1:23, while A Pit was marked with smokes at 0:34 and 1:24 — the utility supported several possible continuations. After the plant, FL1T, zweih and xiELO met MOUZ's retake in B Site and B Doors, preventing PR's opening kill from deciding the outcome. Against the 8% traded-death rate across the entire T half, FL1T's timely response was an important exception.
After this opening (5 similar rounds on the map on a force buy): the hit goes A in 100% against the map's usual 46%; the bomb goes down in 80% of rounds against 54%; first contact at 26.5s against the usual 20.1s.
Steps - R17 · 1:59
The late change of focus survived Jame's AWP
Jame gave PARIVISION its only CT-side opening of the half by taking down xelex in Lower Tunnel from CT Spawn at 0:37, but this duel did not secure the round for the defense. MOUZ continued to work through Middle and Upper Tunnel, then used its remaining utility to mark another area of the map: torzsi threw a molotov in A Pit at 1:07 and Spinx in A Site at 1:12, after which the bomb was planted on A. Even when FL1T and Jame turned the post-plant into a 1v2 against Spinx, time was already working for the T side. The round ended the map and confirmed the trend: PARIVISION's only won CT-side opening produced 0% conversion.
After this opening (33 similar rounds on the map on a full buy): the hit goes A in 97% against the map's usual 45%; the bomb goes down in 94% of rounds against 56%; the attack takes the round in 79% against 56%.
Steps
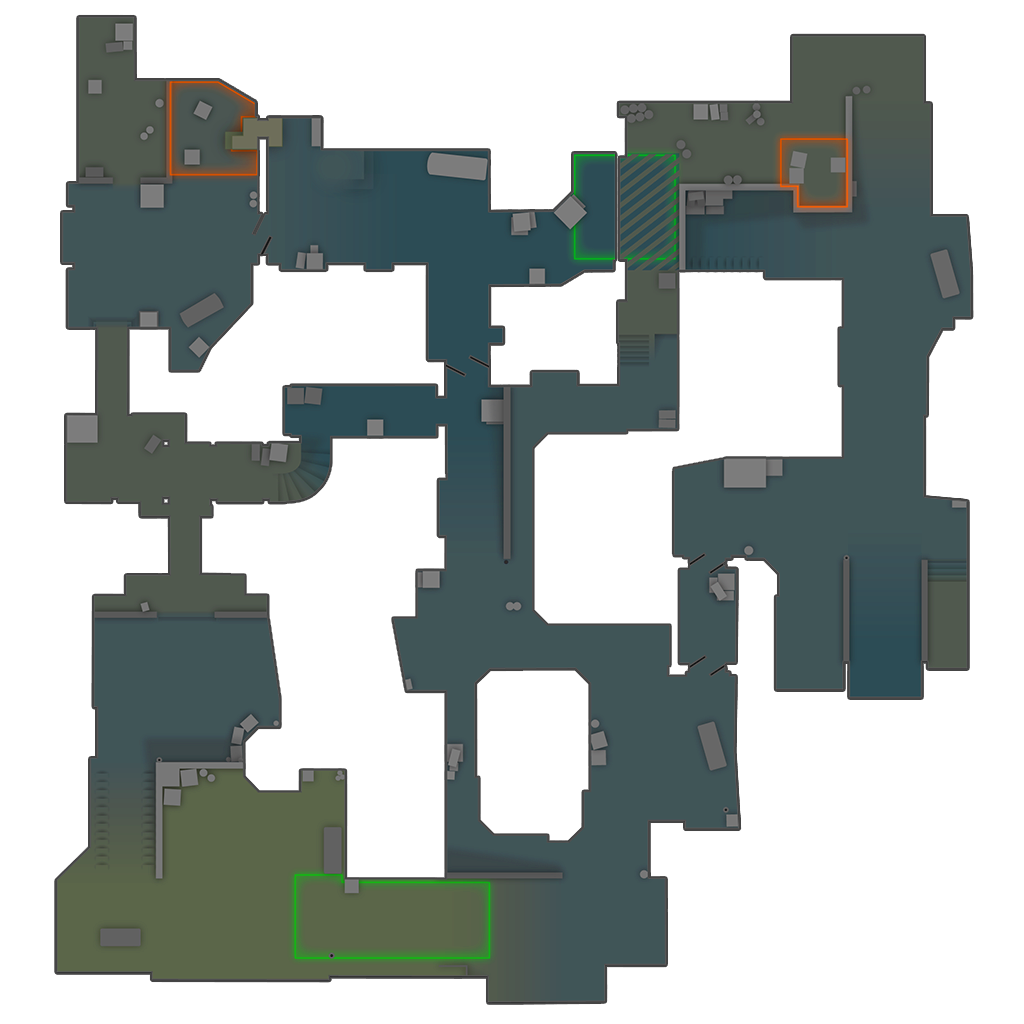
Team habits and markers
roles, setups, signature spots — expand
MOUZ
- AWP: torzsi — 41 of 66 rounds; positions: Mid Doors, CT Spawn
- setup 3 A + 2 Mid — 14 of 67
- setup 2 A + 3 Mid — 10 of 67
- AWP: torzsi — 27 of 57 rounds; positions: Lower Tunnels, T Spawn
- setup 5 Mid — 33 of 57
- setup 1 A + 4 Mid — 13 of 57
- PR moved into Middle — 1 time, around 0:19
- PR moved into Catwalk — 1 time, around 0:19
PARIVISION
- AWP: Jame — 23 of 40 rounds; positions: B Doors, Mid Doors
- setup 2 A + 2 B + 1 Mid — 7 of 40
- setup 3 A + 2 Mid — 5 of 40
- AWP: Jame — 53 of 77 rounds; positions: T Spawn, Lower Tunnels
- setup 5 Mid — 38 of 78
- setup 1 A + 4 Mid — 25 of 78
- slaxejezzz moved into B Site — 1 time, around 0:15
Marks show the 20-second position, “×N” a signature spot.
Map numbers
| Team and side | Rounds | Opening duels won | Conversion | Median | Trades | Main utility zone |
|---|---|---|---|---|---|---|
| MOUZ T | 4/5 | 4 | 75% | 1:01 | 17% | A Short / CT approach · 13 |
| MOUZ CT | 9/12 | 7 | 86% | 0:52 | 33% | A Pit · 26 |
| PARIVISION T | 3/12 | 5 | 40% | 1:07 | 8% | A Short / CT approach · 30 |
| PARIVISION CT | 1/5 | 1 | 0% | 0:37 | 28% | A Pit · 8 |
Conversion — rounds won after winning the opening duel; trades — deaths avenged within five seconds.
Pistol rounds
- R1 — MOUZ (CT)
- R13 — PARIVISION (CT)
Streaks
- MOUZ — 5 rounds in a row (R1–R5)
- MOUZ — 4 rounds in a row (R14–R17)
Rounds thrown away
- R17 — CT lost the round holding a 89% chance
- R5 — T lost the round holding a 89% chance
- R13 — T lost the round holding a 80% chance
- R14 — CT lost the round holding a 71% chance
Broken economy
- R9 — MOUZ lost a full buy against a force buy
Bottom line
MOUZ won Dust2 through a distributed CT setup: xertioN's familiar positions at Mid Doors and xelex on the Long side were supplemented by openings from torzsi, Spinx and PR, so the defense did not depend on a single duel. PARIVISION found a reliable source of opening kills in Jame, but 40% conversion and failed trades in the central areas turned those advantages into isolated moments rather than the basis of a competitive half.
Method and privacy
- Every number is collected from the demo itself, automatically. The editor only proofreads the finished text.
- “Baseline” means averages across the platform's corpus — hundreds of thousands of rounds from official matches. Round win probabilities come from that corpus, not from model guesses.
- Only official matches with open HLTV demos are published. Client demos and strategies are never published and never used in anyone else's report.